
Red... the colour of passion. Violence. Lust. Love. Danger. Strength. Power.
Red is also the theme for this months "Color It Red" blog hop, hosted by Carol of 'Just Let Me Quilt'.

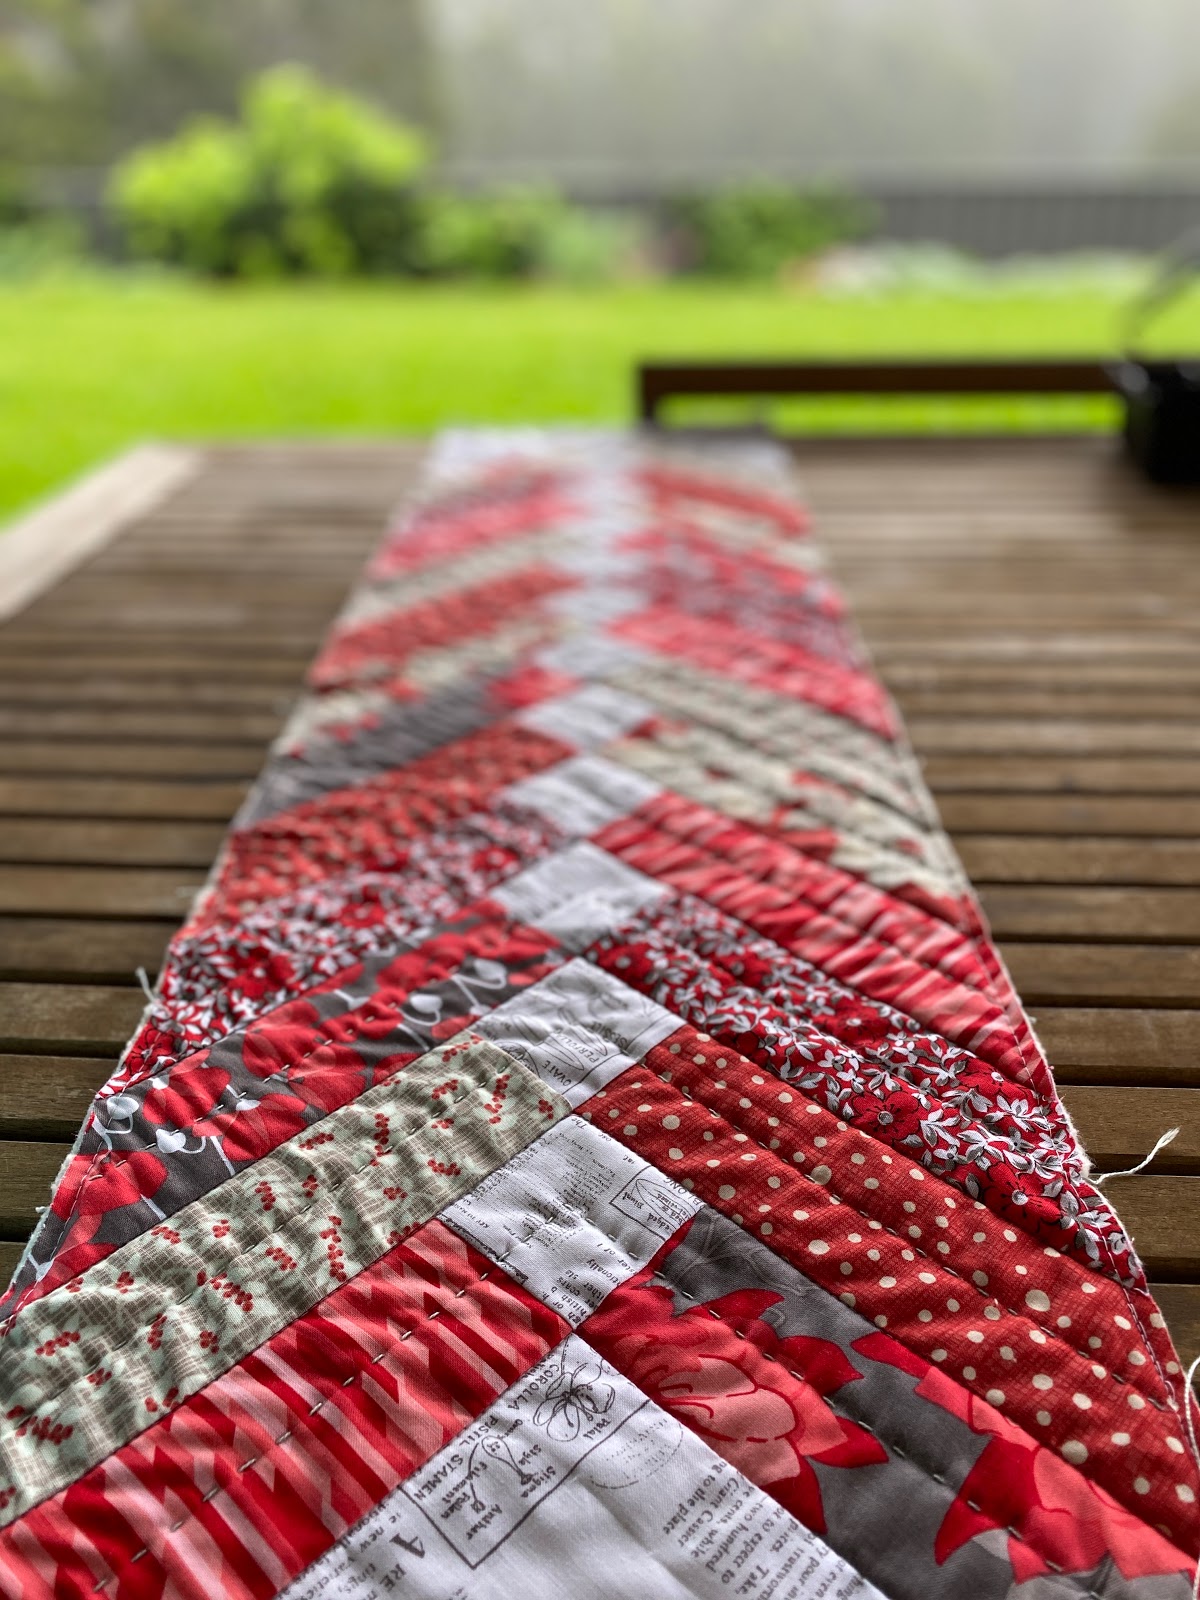
I wasn't entirely sure what I wanted to make, but when I stood at my fabric shelf looking at the red prints, a few little orphan F8's caught my eye. They were originally part of a bigger bundle which I'd used years ago. Lucky for me, these remained. I chose a couple of those F8's and then a few other scrap strips which had a matching red "tone".
At this point, my pile of fabric was all looking a little bit "too" red, so I thought I'd tone my selection down a little with some shades of grey/cream. Perfect!


I made this Red Braid Table Runner and had such a fun time putting it together. I was so organised that I even had time to hand quilt it. It's nice when I don't leave things to the last minute and have the time to finish them as planned. Ahem...


If you'd like to make a Red Braid Table Runner too, start with some assorted strips of red and grey print fabrics. The strips need to measure 2.5" x 8.5" - which is why a F8 is perfect or even a few jelly roll strips.
From your low volume co-ordinating fabric, you will need a square measuring 9.5" as well as 2.5" squares.
As a guess, I'd suggest starting with 18 red/grey strips and 9 low-volume 2.5" squares. You can always add more if you'd like your table runner to be longer.
Divide the strips into two even piles and then sew a 2.5" square to the end of each rectangle from one pile. You will end up with one pile of pieced rectangles and one pile without. We'll call these the pieced and the non-pieced rectangle piles.
Still with me? Good, okay, let's move on.


Now the real fun begins - assembling your table runner.
Using the image (above) as a guide, place the HST on your work surface and chose a non-pieced rectangle. Sew it to the right side of the HST. Press.
Sew a pieced rectangle so that it lines up with the edge of non-pieced rectangle. Press.
Sew another non-pieced to the right side. Press.
And another pieced to the left. Press.
Continue doing this until you've reached your desired length of table runner.
Remember those Quarter Square Triangles (QST) we put aside earlier? Let's now sew those to the end of the runner. Position them so that you end up with a nice flat (squared) edge.
It was at this stage that I sandwiched my project with batting and backing, basted and then stitched in the ditch on the sewing machine.

Once it's stitched down, it's time to trim those jagged edges. Measure 5.5" from the centre of the table runner (at the points of the white/low-volume squares) and trim. Flip the project over and repeat on the other side.
You should now have a lovely, squared off Red Braid Table Runner. Add a little bit of extra hand quilting if you like, or just sew on the binding and display your new table runner.

This has been such a fun project and I'd like to thank Carol for hosting this Color it Red blog hop.

Red is also the theme for this months "Color It Red" blog hop, hosted by Carol of 'Just Let Me Quilt'.

I wasn't entirely sure what I wanted to make, but when I stood at my fabric shelf looking at the red prints, a few little orphan F8's caught my eye. They were originally part of a bigger bundle which I'd used years ago. Lucky for me, these remained. I chose a couple of those F8's and then a few other scrap strips which had a matching red "tone".
At this point, my pile of fabric was all looking a little bit "too" red, so I thought I'd tone my selection down a little with some shades of grey/cream. Perfect!


I made this Red Braid Table Runner and had such a fun time putting it together. I was so organised that I even had time to hand quilt it. It's nice when I don't leave things to the last minute and have the time to finish them as planned. Ahem...

If you'd like to make a Red Braid Table Runner too, start with some assorted strips of red and grey print fabrics. The strips need to measure 2.5" x 8.5" - which is why a F8 is perfect or even a few jelly roll strips.
From your low volume co-ordinating fabric, you will need a square measuring 9.5" as well as 2.5" squares.
As a guess, I'd suggest starting with 18 red/grey strips and 9 low-volume 2.5" squares. You can always add more if you'd like your table runner to be longer.
Divide the strips into two even piles and then sew a 2.5" square to the end of each rectangle from one pile. You will end up with one pile of pieced rectangles and one pile without. We'll call these the pieced and the non-pieced rectangle piles.
Still with me? Good, okay, let's move on.

Now, from that low-volume 9.5" square, cut it across on the diagonal. You have two half square triangles (HST) at this stage. Leave one of these HSTs as this will be the starting point of your project and cut the remaining HST in half again to yield 2 Quarter Square Triangles (QST). These will be used at the end of the table runner, so you can be put these aside for now.

Now the real fun begins - assembling your table runner.
Using the image (above) as a guide, place the HST on your work surface and chose a non-pieced rectangle. Sew it to the right side of the HST. Press.
Sew a pieced rectangle so that it lines up with the edge of non-pieced rectangle. Press.
Sew another non-pieced to the right side. Press.
And another pieced to the left. Press.
Continue doing this until you've reached your desired length of table runner.
Remember those Quarter Square Triangles (QST) we put aside earlier? Let's now sew those to the end of the runner. Position them so that you end up with a nice flat (squared) edge.
It was at this stage that I sandwiched my project with batting and backing, basted and then stitched in the ditch on the sewing machine.

Once it's stitched down, it's time to trim those jagged edges. Measure 5.5" from the centre of the table runner (at the points of the white/low-volume squares) and trim. Flip the project over and repeat on the other side.
You should now have a lovely, squared off Red Braid Table Runner. Add a little bit of extra hand quilting if you like, or just sew on the binding and display your new table runner.

This has been such a fun project and I'd like to thank Carol for hosting this Color it Red blog hop.


I love your runner! Thanks so much for the instructions.
ReplyDeleteThank you and it's my pleasure :)
DeleteLove your table runner!
ReplyDeleteThanks so much :)
DeletePretty runner! While I love the red, it would great in any color, even scrappy. Thanks for sharing!
ReplyDeleteYes it'd definitely be fun in any colourway or even one in each colourway ;-) Decorate in whatever colour the mood strikes.
DeleteGreat runner. Thanks for the tutorial. I always thought the braid was much more complicated. Will definitely need to give this a go.
ReplyDeleteI would love to see your braid runner if you decide to make one. it really is quite simple to make and lots of fun.
DeleteThe big quilting is so pretty! Thanks for sharing!
ReplyDeleteBig stitch quilting one of my favourite ways to 'finish' a project. I'm a sucker for the texture.
DeleteOh my goodness! I woke today needing to sew a spring table runner. I finished a queen size top yesterday so a small project sounded just right. This is perfect! Thank you.
ReplyDeleteIt's nice to have small projects to make in between big ones. I'd love to see your braid runner if you decide to make one. Happy stitching :)
DeleteBeing organized? Starting on time? Alien concepts that seem to work.
ReplyDeleteHahaha I always seem to leave things to the last minute. It was a nice relaxed project which I had finished a couple of weeks ago.
DeleteI love your runner. Thanks for the instructions
ReplyDeleteThank you so much
Deletenice table runner
ReplyDeleteBeautiful table runner. Thanks so much for the instructions!
ReplyDeleteThank you and it's my pleasure :)
DeleteThis is a gorgeous runner and your instructions are great. Thank you for sharing it! I love how you coordinated the red colors to make this a really beautiful project. Thank you so much for hopping with us!
ReplyDeleteThanks Carol. I love a blog hop and this was a really fun challenge - especially figuring out what to make.
DeleteThank you for the free pattern. Your fabrics are so delicious. Love the red, white and grey.
ReplyDeleteIt's my pleasure to share the pattern. It's a fun design which is really very simple to put together (but may look a little tricky).
DeleteThanks for the pattern. This is a beautiful runner, and you've used great fabrics for it.
ReplyDeleteThank you for stopping by :)
DeleteI can see this in lots of fun colours - thanks for a great tutorial :)
ReplyDeleteA braid table runner for every season? That'd be fun to make. Thanks for stopping by.
DeleteIt's gorgeous and you've topped it with your fabulous quilting! I want to play now! :-)
ReplyDeleteOh yes, go for it! Sewing time is the best time of the day :)
DeleteThank you for your instructions. I’ll likely do a color other than red, but I may need to make one for my mother in law.
ReplyDeleteIt's my pleasure. Yes, this would work well in any colour, but the red blog hop meant this one had to be red. Happy sewing and if you make one for your MIL, I'd love to see it.
Deletelovely runner and I LOVE that owl on there!
ReplyDeleteI am a bit of an owl fan - still. They were in fashion a few years ago, but i still like them and have little owl ornaments all around the house and even in my garden.
DeleteLovely. Thank you for the instructions.
ReplyDeleteNo worries :)
DeleteBeautiful table runner. I must have a go.
ReplyDeleteYay! I'd absolutely love to see your braid runner. Happy Sewing!
DeleteGorgeous runner and thanks for the instructions which have been book marked on my "to do list".
ReplyDeleteYay Karen! I look forward to seeing your braid runner too. I've been toying with the idea of making a quilt in this style. The same long panels, but placed in alternating up/down columns. Maybe something I need to play with at some time.
DeleteVery versatile pattern. Thanks for sharing the tutorial with us
ReplyDeleteIt's my pleasure. Thanks for stopping by today :)
DeleteThank you for sharing your neat braided table runner! This is one quilting project/technique that has been on my "want to do list". I appreciate the tutorial plus the nudge & encouragement to get to work.
ReplyDeleteIt's my pleasure and I look forward to seeing your braid runner too. It's a design that looks tricky, but in reality is really quite simple to piece together. Happy Sewing and thanks for stopping by :)
DeleteHi Anorina, such a lovely runner, enjoyed seeing the process of how to create it... loved the use of the text print to separate those reds... Just beautiful.
ReplyDeleteThank you so much Marian. It's such fun to create and looks more complicated than it actually is (I like those sorts of patterns). Have a great day :)
DeleteWhat a sweet runner - thank you for the pattern. I do think the hand-stitching makes it even more special.
ReplyDeleteThank you so much and it's my pleasure to share the pattern with everyone. I'd love to see a whole bunch of different colour braid runners appearing on my feed. I really love hand stitching but often don't have enough time to do a whole quilt, so just little bits here and there keep me happy :)
Deletethis is absolutely beautiful Anorina. Thank you so much for sharing your mad skills
ReplyDeleteI am inspired now
I’m so pleased to hear this Rosemary and I look forward to seeing what you create :)
DeleteVery pretty runner.
ReplyDeleteThank you :)
DeleteWhat a fun project! Thank you for the tutorial.
ReplyDeleteYes it really was :)
DeleteThanks for the tutorial!! I've always wanted to make a runner like this.
ReplyDeleteIt's my pleasure and I look forward to seeing your braid runner :)
DeleteLove the soft gray mixed in and worked well to tone down the red. Braids make for a sweet runner and love the little owls.
ReplyDeleteThe original pile of fabric I had on my table was just too red and I'm glad that I had some grey/red prints that worked well (even through they're different fabric lines and manufacturers).
DeleteI'm a bit of a crazy owl lady and have a lot of owls around the house :)
Very nice table runner, and that little owl is just adorable!! Thanks for sharing!
ReplyDeleteGorgeous table runner, and love that you had time to hand quilt it. Awesome job.
ReplyDeleteI love Chevron braids! They are fun to make too!
ReplyDeleteCute, Cute
So beautiful... love the hand quilting!
ReplyDeleteVery cute table runner and love that you hand quilted it.
ReplyDeleteI love your color choices! This is a great table runner. Thank you so much for the tutorial. I will definitely be giving this design a try!
ReplyDeleteBeautiful runner! I haven't seen the braid done quite like this before (with the large square at one end) and it's very effective!
ReplyDeleteBeautiful runner, fabulous in red, gray & cream! Thanks for sharing.
ReplyDeleteBeautiful! Love the hand quilting on it! Thanks for the tutorial too. Great post!
ReplyDeleteWhat fun that looks, and easy enough for a quick gift. Thanks for the directions. This is one I had wondered about, and you had some shortcuts from my ideas.
ReplyDeleteYour runner is gorgeous. The simplicity of the design allows the fabrics to shine. And your hand quilting is the perfect touch to finish the project.
ReplyDeleteThanks for sharing how to make it, too.
Your table runner is so pretty. You do a wonderful job with photography.
ReplyDeleteBeautiful! Thank you for showing your design process with the triangle start and end cuts. This looks like a great way to start and finish a braided table runner. I will definitely use this technique for making braids in the future ... :) Pat
ReplyDelete