
My Step in Time Quilt was originally published in Australian Homespun magazine, early 2012. It’s a fun and easy quilt to make and perfect for a beginner who wants to play with some pre-cut fabrics.
It’s also a fun weekend project for a more experienced quilter.
The finished quilt measures approximately 48” x 52”.
If you’d like a bed sized quilt, just by double the amounts of fabric. Rather than using 2 charm packs, you could use a layer cake cut - start the process by cutting the layers into 4 x 5” squares.
A seam allowance of ¼ inch is included throughout. Requirements are based on fabric 112cm (44” wide).

Materials Needed:
2 x charm packs OR 80 x 5”x 5” squares (I used “It’s a Hoot” by Momo for Moda)
1.25 yard of a solid fabric – light (I used kona cotton in white)
1.25 yard of a solid fabric – medium (I used kona cotton in ash)
0.5 yard of a co-ordinating print fabric for the binding
* Backing fabric (extra wide) or a pieced backing measuring at least 52” x 56”
52” x 56” piece of batting
Neutral thread for piecing & quilting
Sewing machine with a ¼” foot
Cutting mat, rotary cutter, ruler
Iron and ironing board
General sewing supplies
Cutting:
Solid Fabric - Light
(9) 2.5” strips x WOF
Crosscut (80) 2.5” x 4.5”
Solid Fabric – Medium
(9) 2.5” strips x WOF
Crosscut (80) 2.5” x 4.5”
Charm Packs
Cut 78 fabric squares to 5” x 4.5”
Cut each square in half to yield 156 (2.5” x 4.5”)
Binding Fabric
Cut 5 x 2.25” strips - WOF
Construction:
Place 1 solid fabric and 1 printed fabric strip with right sides facing together.
Sew along the long edge using a ¼” seam allowance.
Do this for all of the fabric strips.
Press the seam to the printed side.

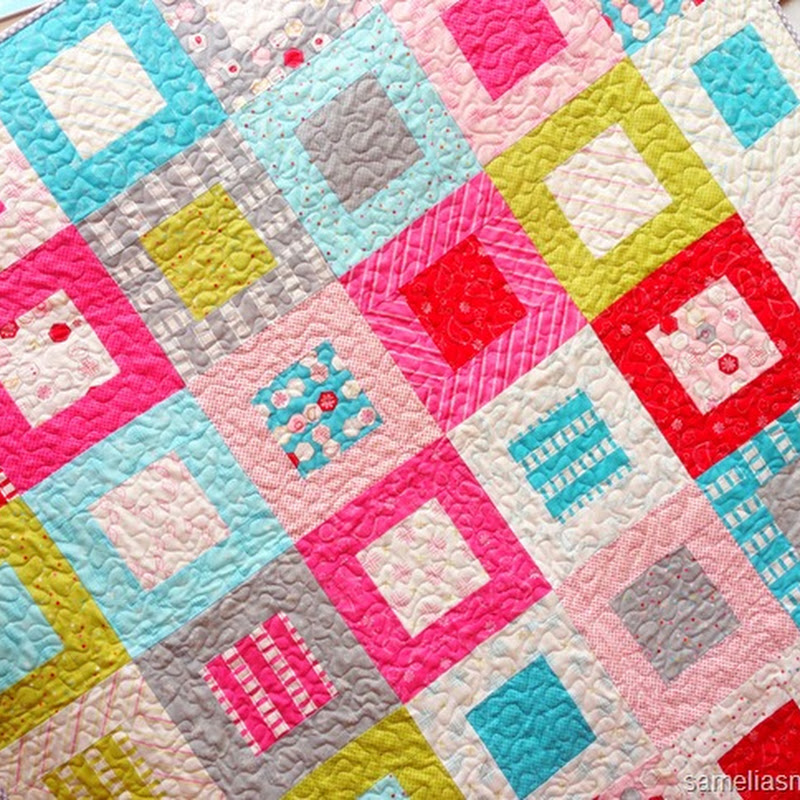
Arrange the blocks so that the solid fabrics look like “steps”.

Alternate between 2x white solid and 2x grey solid to make a row of 12 blocks.
In the second row, place the first block in the opposite direction of the block directly above it (with the same solid colour). The second block of the row will be the alternate solid colour (in the opposite direction).

Continue arranging the blocks in this alternating manner.
The finished quilt top will have 13 rows of 12 blocks each.
Quilting:
Press the quilt top well.
Piece the backing if required and press well.
Lay the backing fabric right side down on a hard surface and use masking tape to secure it, ensuring the fabric is taut but not distorted.
Layer the batting square over it, then the well pressed quilt top.
Baste the 3 layers together with safety pins.

Quilt as desired - I used a free motion meandering pattern all over the quilt.


Join the 2.25” strips end to end. Trim the seams and press them open.
Press the strip in half lengthways with the wrong sides together.
Beginning halfway along one side of the quilt and leaving a 12 inch tail, pin the binding to the front of the quilt with the raw edges aligned. Ensure the joins are not on the corners.
Stitch it in place with a ¼” seam, mitering the corners as you go.
When you’re 12” from the starting point, remove the quilt from the machine.
On a flat surface, use your fingers to walk the two tails together until they meet.
Open tails and finger press where the seam should be. Sew along this fold. Trim the seam and press open.
Check that the binding fits well and continue attaching your binding.
Trim the batting and backing. Turn the folded edge of the binding over the raw edges to the back of the quilt and slip stitch it in place. If you prefer, machine sew your binding.

I hope you enjoy making my Step in Time Quilt. It’s such a fun quilt to make and really comes together quickly… which is a bonus, right?
If you make this quilt, I’d love to see it. Send me some photos or post it on the Samelia’s Mum Facebook Page.

It’s also a fun weekend project for a more experienced quilter.
The finished quilt measures approximately 48” x 52”.
If you’d like a bed sized quilt, just by double the amounts of fabric. Rather than using 2 charm packs, you could use a layer cake cut - start the process by cutting the layers into 4 x 5” squares.
A seam allowance of ¼ inch is included throughout. Requirements are based on fabric 112cm (44” wide).

Materials Needed:
2 x charm packs OR 80 x 5”x 5” squares (I used “It’s a Hoot” by Momo for Moda)
1.25 yard of a solid fabric – light (I used kona cotton in white)
1.25 yard of a solid fabric – medium (I used kona cotton in ash)
0.5 yard of a co-ordinating print fabric for the binding
* Backing fabric (extra wide) or a pieced backing measuring at least 52” x 56”
52” x 56” piece of batting
Neutral thread for piecing & quilting
Sewing machine with a ¼” foot
Cutting mat, rotary cutter, ruler
Iron and ironing board
General sewing supplies
Cutting:
Solid Fabric - Light
(9) 2.5” strips x WOF
Crosscut (80) 2.5” x 4.5”
Solid Fabric – Medium
(9) 2.5” strips x WOF
Crosscut (80) 2.5” x 4.5”
Charm Packs
Cut 78 fabric squares to 5” x 4.5”
Cut each square in half to yield 156 (2.5” x 4.5”)
Binding Fabric
Cut 5 x 2.25” strips - WOF
Construction:
Place 1 solid fabric and 1 printed fabric strip with right sides facing together.
Sew along the long edge using a ¼” seam allowance.
Do this for all of the fabric strips.
Press the seam to the printed side.

Arrange the blocks so that the solid fabrics look like “steps”.

Alternate between 2x white solid and 2x grey solid to make a row of 12 blocks.
In the second row, place the first block in the opposite direction of the block directly above it (with the same solid colour). The second block of the row will be the alternate solid colour (in the opposite direction).

Continue arranging the blocks in this alternating manner.
The finished quilt top will have 13 rows of 12 blocks each.
Quilting:
Press the quilt top well.
Piece the backing if required and press well.
Lay the backing fabric right side down on a hard surface and use masking tape to secure it, ensuring the fabric is taut but not distorted.
Layer the batting square over it, then the well pressed quilt top.
Baste the 3 layers together with safety pins.

Quilt as desired - I used a free motion meandering pattern all over the quilt.

Binding:
Join the 2.25” strips end to end. Trim the seams and press them open.
Press the strip in half lengthways with the wrong sides together.
Beginning halfway along one side of the quilt and leaving a 12 inch tail, pin the binding to the front of the quilt with the raw edges aligned. Ensure the joins are not on the corners.
Stitch it in place with a ¼” seam, mitering the corners as you go.
When you’re 12” from the starting point, remove the quilt from the machine.
On a flat surface, use your fingers to walk the two tails together until they meet.
Open tails and finger press where the seam should be. Sew along this fold. Trim the seam and press open.
Check that the binding fits well and continue attaching your binding.
Trim the batting and backing. Turn the folded edge of the binding over the raw edges to the back of the quilt and slip stitch it in place. If you prefer, machine sew your binding.

I hope you enjoy making my Step in Time Quilt. It’s such a fun quilt to make and really comes together quickly… which is a bonus, right?
If you make this quilt, I’d love to see it. Send me some photos or post it on the Samelia’s Mum Facebook Page.


gorgeous Anorina,thankyou for sharing.xx
ReplyDeleteGreat tute Anorina... Good on ya!
ReplyDeleteVery generous of you to share :)
Robyn x
Beautiful Anorina! The Ash & White work so well together as the solids! x
ReplyDeleteBeatiful patchwork!!!
ReplyDeleteBeatiful!
Congratulacions!
hugs
Maria Filomena
Wonderful quilt - thanks for sharing.
ReplyDeleteThat looks fantastic, well done!
ReplyDeleteOh that looks amazing! Wish I had the talent!
ReplyDeleteLove this, Anorina. Sometimes the simple designs are the most effective! I'll have to use up some of my charm squares...
ReplyDeleteI am so jealous!!! I just simply don't have the patience. Looks amazing - you are one talented blogger girl!!
ReplyDeleteI love the colours. That is just gorgeous. Well done.
ReplyDeleteI've been a big knitter - although I've stopped in the last two years. My mum gave me her overlocker the other day and I'm so tempted to start creating!
Lovely quilt! Looks great!
ReplyDeleteNavy Wifey Peters @ Submarine Sunday Link Party
http://usscrafty.blogspot.com/2013/05/submarine-sunday-32.html
Hello,
ReplyDeletethank you for the tutorial (found your blog thanks to Craft Gossip).
Beatrice.
This comment has been removed by the author.
ReplyDeleteAwesome tutorial! Thank you so much for posting! This got me through some hotel living while we were in between houses. LOVE IT. I plan on making another one very soon! Thank you again!
ReplyDeletehttp://heartsandsharts.com/sewing-step-in-time-quilt-from-samelias-mum/
I love your Step in Time quilt Anorina. Thank you very much for the tutorial.
ReplyDelete